

Apache CloudStack — Installation & First Deployment
Part 2 of the Apache CloudStack series: management server setup, hypervisor preparation, and bringing up a working zone.
What This Post Covers
This post walks through a complete all-in-one Apache CloudStack 4.23 lab installation on a single Ubuntu 24.04 LTS machine. By the end you will have:
- A running CloudStack management server
- A MySQL 8 database configured for CloudStack
- NFS primary and secondary storage
- A KVM hypervisor host (the same machine)
- A fully operational zone with system VMs running
Everything here was verified on real hardware. All commands and outputs are from the actual lab.
This is Part 2 of the Apache CloudStack series. Part 1 covers architecture and planning.
Prerequisites
- Ubuntu 24.04 LTS (noble) — server install, no GUI
- A machine with CPU virtualization support (VT-x/AMD-V)
- Root or sudo access
- Internet access for package downloads
The official Quick Installation Guide is the reference. This post follows the same steps but documents the real-world issues you will hit.
Step 1: OS Preparation
Set the hostname and ensure time synchronization:
sudo hostnamectl set-hostname cloudstack.lab.local
sudo apt-get install -y chrony
sudo systemctl enable --now chrony
Verify:
hostname -f    # should show cloudstack.lab.local
timedatectl    # should show "System clock synchronized: yes"
Step 2: NFS Storage
CloudStack needs shared storage for primary (VM disks) and secondary (templates, ISOs) storage. On an all-in-one node, NFS on localhost works fine.
sudo apt-get install -y nfs-kernel-server
sudo mkdir -p /export/primary /export/secondary
sudo chmod 777 /export/primary /export/secondary
Add to /etc/exports:
/export/primary  *(rw,no_root_squash,no_subtree_check)
/export/secondary  *(rw,no_root_squash,no_subtree_check)
sudo exportfs -a
sudo systemctl restart nfs-kernel-server
Verify:
showmount -e localhost
Step 3: MySQL Configuration
Install MySQL 8 and configure it for CloudStack:
sudo apt-get install -y mysql-server
Edit /etc/mysql/mysql.conf.d/mysqld.cnf:
[mysqld]
server_id=1
max_connections=350
innodb_lock_wait_timeout=600
binlog_format=ROW
log_bin=mysql-bin
The CloudStack quick installation guide shows server_id=source-01 in its MySQL configuration example. MySQL 8 rejects this with:
[MY-000058] Unknown suffix 's' used for variable 'server_id' (value 'source-01')
Use a numeric value like server_id=1 instead.
sudo systemctl restart mysql
Step 4: Management Server Installation
Add the CloudStack repository and install:
sudo apt-get install -y gnupg2
wget -qO- https://download.cloudstack.org/release.asc | sudo gpg --dearmor -o /usr/share/keyrings/cloudstack-keyring.gpg
echo "deb [signed-by=/usr/share/keyrings/cloudstack-keyring.gpg] https://download.cloudstack.org/ubuntu noble 4.23" | sudo tee /etc/apt/sources.list.d/cloudstack.list
sudo apt-get update
sudo apt-get install -y cloudstack-management cloudstack-common openjdk-17-jre-headless
Initialize the database:
sudo cloudstack-setup-databases cloud:<db-password>@localhost --deploy-as=root
Start the management server:
sudo cloudstack-setup-management
Verify:
systemctl is-active cloudstack-management    # should show "active"
curl -s -o /dev/null -w "%{http_code}" http://127.0.0.1:8080/client/    # should show "200"
ERROR ClusterManagerImpl ... cluster node IP should be valid local address where the server is running
The root cause is in /etc/cloudstack/management/db.properties:
cluster.node.IP=127.0.1.1
This comes from the default /etc/hosts entry 127.0.1.1 <fqdn>. The -i flag passed to cloudstack-setup-databases does not rewrite an already-generated db.properties file. Fix it directly:
sudo sed -i 's/^cluster.node.IP=.*/cluster.node.IP=<management-ip>/' /etc/cloudstack/management/db.properties
sudo systemctl restart cloudstack-management
Replace <management-ip> with the machine’s real IP address.
Step 5: Network Configuration
For an all-in-one lab, a single bridge (cloudbr0) carries all traffic types. Configure it via netplan:
# /etc/netplan/50-cloud-init.yaml
network:
  version: 2
  ethernets:
    eth0: {}
  bridges:
    cloudbr0:
      addresses: [<management-ip>/24]
      routes:
        - to: default
          via: <gateway-ip>
      nameservers:
        addresses: [8.8.8.8, 8.8.4.4]
      parameters:
        stp: true
        forward-delay: 4
sudo netplan apply
Disable cloud-init network management to prevent conflicts:
echo "network: {config: disabled}" | sudo tee /etc/cloud/cloud.cfg.d/99-disable-network-config.cfg
Update /etc/hosts to remove the 127.0.1.1 entry and add the real IP:
<management-ip> cloudstack.lab.local cloudstack
Step 6: KVM Host Setup
Install the KVM agent and configure libvirt:
sudo apt-get install -y cloudstack-agent qemu-kvm libvirt-daemon-system
Configure libvirt for CloudStack. Edit /etc/libvirt/libvirtd.conf:
listen_tls = 0
listen_tcp = 0
tcp_port = "16509"
auth_tcp = "none"
mdns_adv = 0
Set legacy remote mode and enable listening:
echo 'remote_mode = "legacy"' | sudo tee -a /etc/libvirt/libvirt.conf
echo 'LIBVIRTD_ARGS = "--listen"' | sudo tee /etc/default/libvirtd
Mask the modular libvirt sockets (Ubuntu 24.04 uses modular daemons):
sudo systemctl mask libvirtd.socket libvirtd-ro.socket libvirtd-admin.socket libvirtd-tls.socket libvirtd-tcp.socket
Disable AppArmor for libvirt:
sudo ln -sf /etc/apparmor.d/usr.sbin.libvirtd /etc/apparmor.d/disable/
sudo ln -sf /etc/apparmor.d/usr.lib.libvirt.virt-aa-helper /etc/apparmor.d/disable/
sudo apparmor_parser -R /etc/apparmor.d/usr.sbin.libvirtd
sudo apparmor_parser -R /etc/apparmor.d/usr.lib.libvirt.virt-aa-helper
Restart libvirt:
sudo systemctl restart libvirtd
Verify:
sudo virsh nodeinfo # should show CPU and memory info
Step 7: Zone Creation
Log in to the CloudStack UI at http://<management-ip>:8080/client/ with admin / password.
Navigate to Infrastructure → Zones → Add Zone. The wizard has these steps:
- Zone type — select Core
- Core Zone type — select Advanced
- Zone details — fill in:
- Name:
Zone1 - IPv4 DNS1:
8.8.8.8 - IPv4 DNS2:
8.8.4.4 - Internal DNS 1:
8.8.8.8 - Internal DNS 2:
8.8.4.4 - Hypervisor:
KVM(auto-populated)
- Name:
- Network — configure physical network and traffic:
- Physical Network 1 with VLAN isolation
- Public traffic: gateway
<gateway-ip>, netmask255.255.255.0, start IP<public-start>, end IP<public-end> - Pod: name
Pod1, reserved system gateway<gateway-ip>, netmask255.255.255.0, start IP<reserved-start>, end IP<reserved-end> - Guest traffic: VLAN range
100-200
- Add Resources:
- Cluster: name
Cluster1, archx86_64 - Host: IP
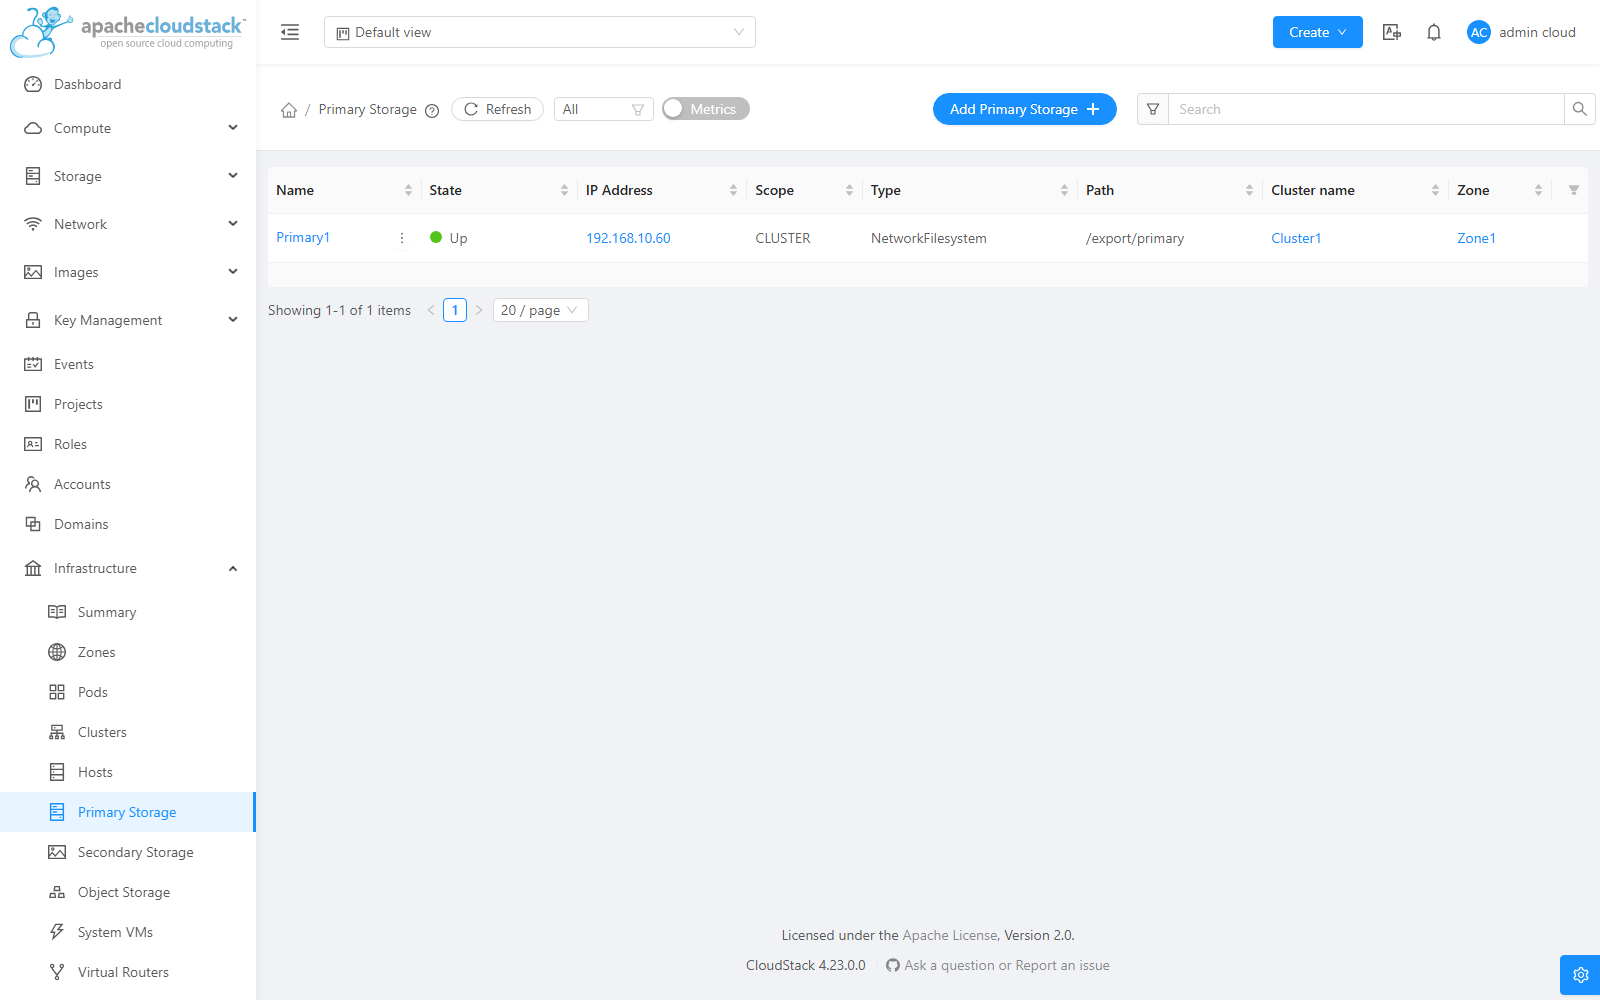
<management-ip>, usernameroot(or a sudo user), password - Primary storage: name
Primary1, protocol NFS, server<management-ip>, path/export/primary - Secondary storage: name
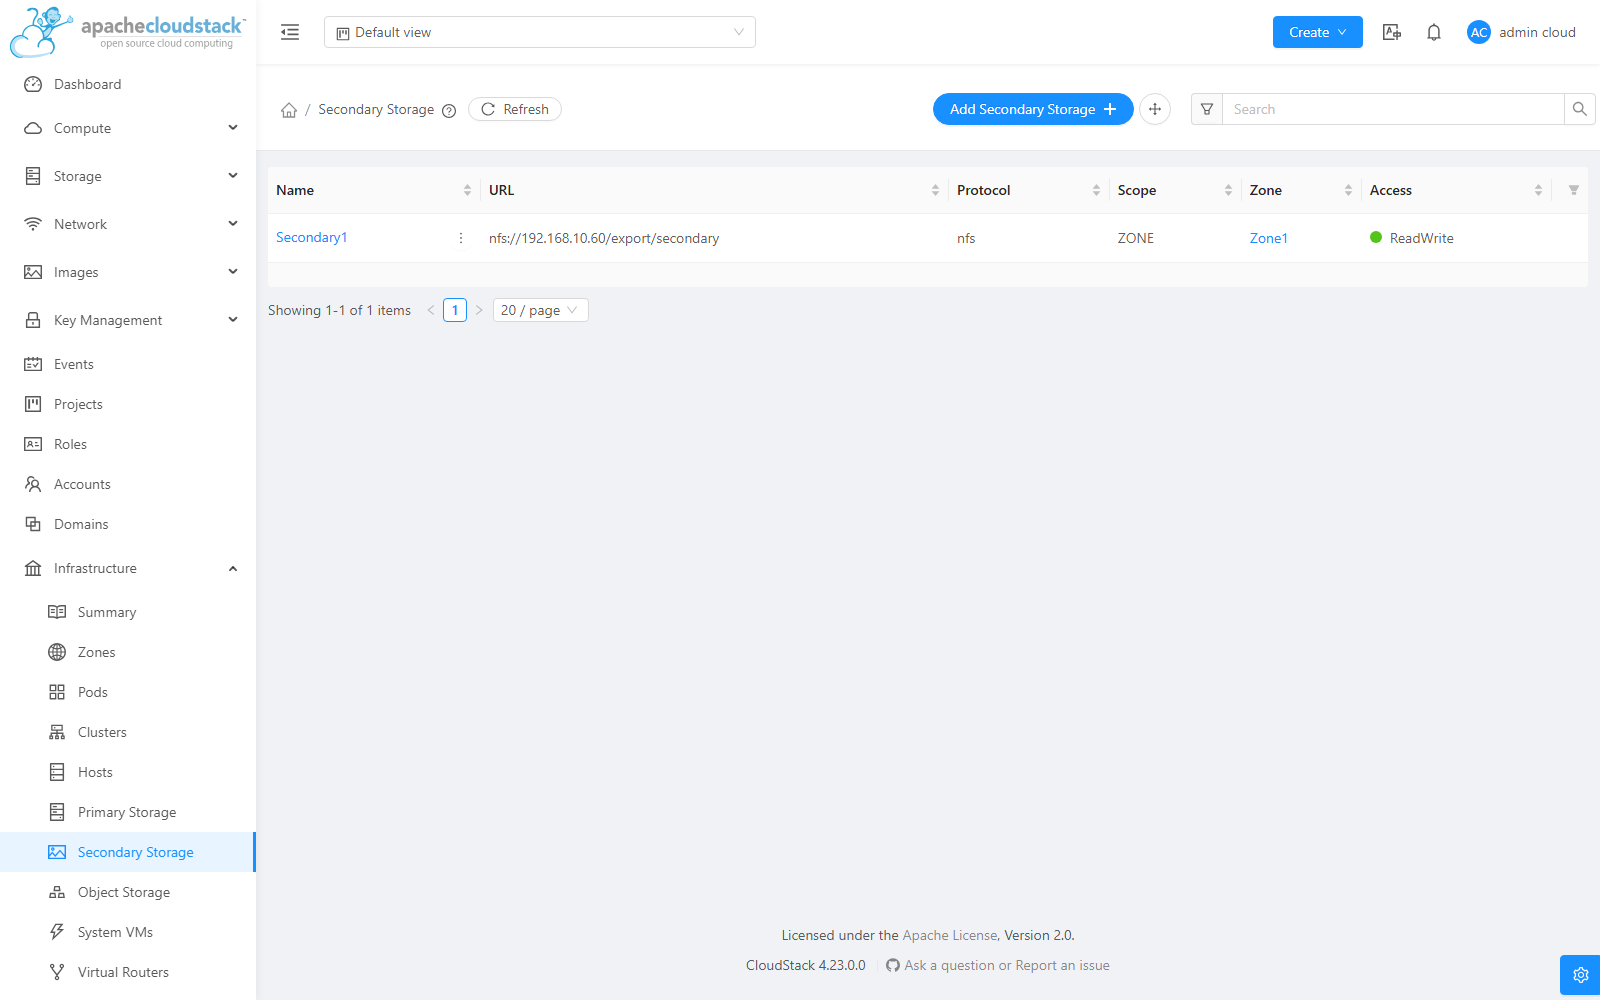
Secondary1, provider NFS, server<management-ip>, path/export/secondary
- Cluster: name
- Launch — click Launch Zone
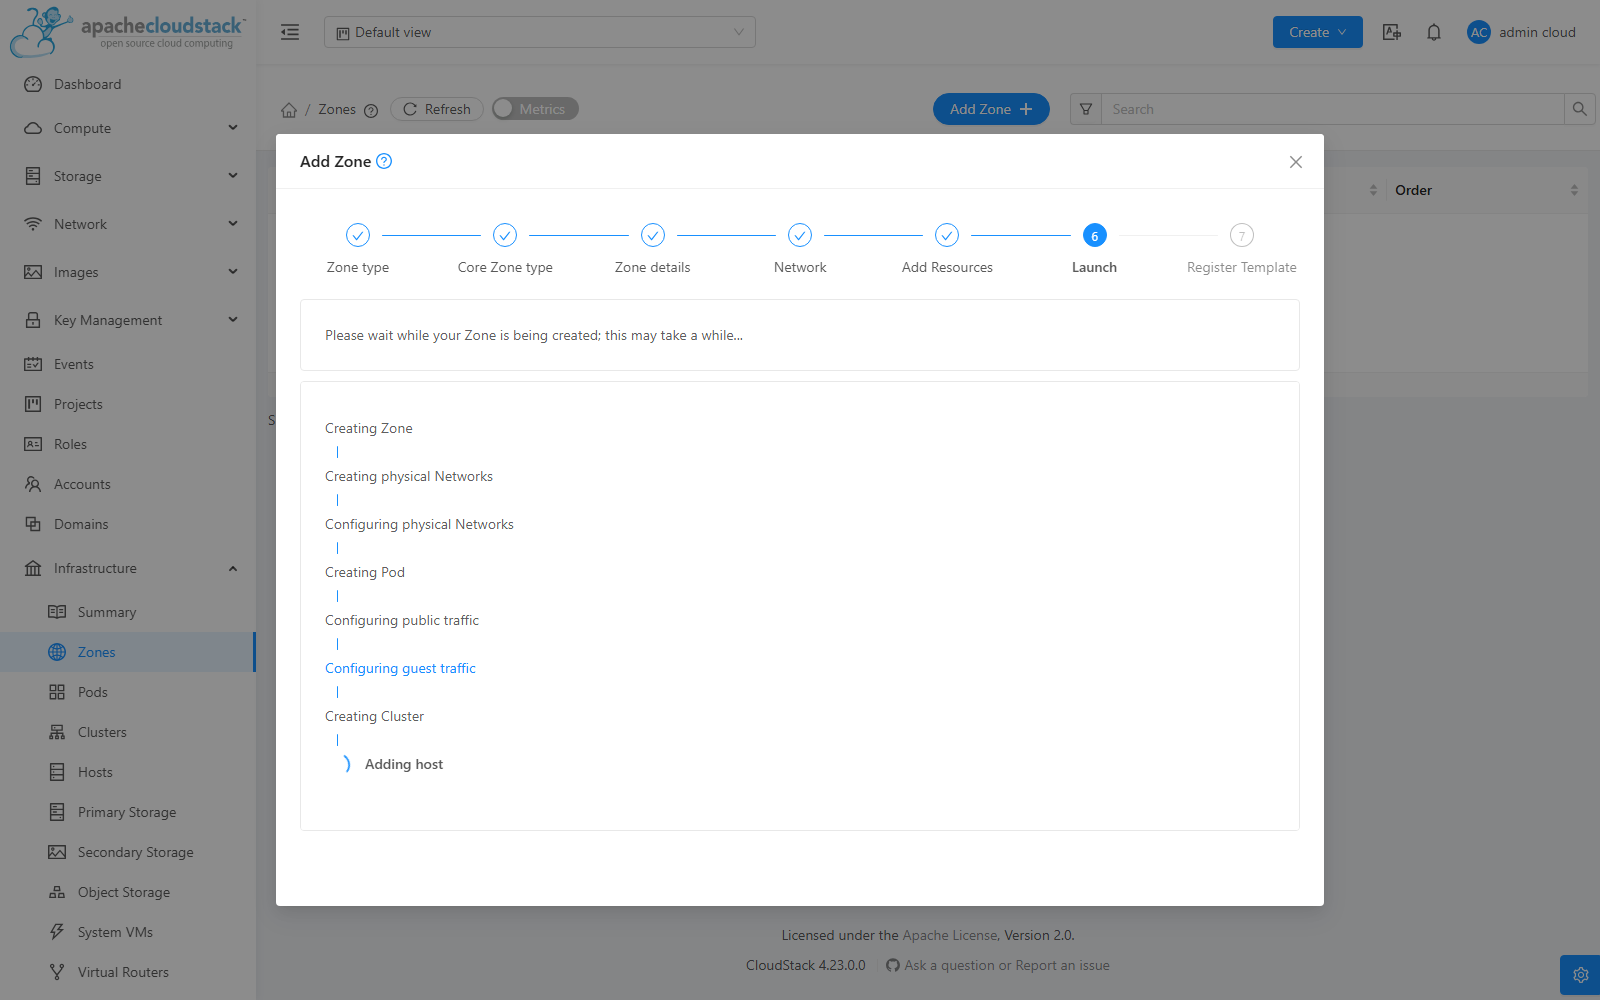
The zone creation process runs server-side and takes several minutes. The UI shows progress:
Creating Zone → Creating physical Networks → Configuring public traffic →
Creating Pod → Creating Cluster → Adding host → Creating storage
Step 8: Post-Creation Fixes
After the zone is created, two manual fixes are needed on an all-in-one lab:
Fix 1: Agent Host Property
The KVM agent may have been configured with the wrong management server IP. Check:
sudo grep '^host=' /etc/cloudstack/agent/agent.properties
If it shows an old or incorrect IP, fix it:
sudo sed -i 's/^host=.*/host=<management-ip>/' /etc/cloudstack/agent/agent.properties
sudo systemctl restart cloudstack-agent
Fix 2: Traffic Type Labels
The KVM traffic labels may be NULL. Fix them:
sudo mysql -e "UPDATE cloud.physical_network_traffic_types SET kvm_network_label='cloudbr0' WHERE kvm_network_label IS NULL;"
Enable the Zone
The zone is created in Disabled state. Enable it:
sudo mysql -e "UPDATE cloud.data_center SET allocation_state='Enabled' WHERE name='Zone1';"
sudo systemctl restart cloudstack-management
Step 9: System VMs
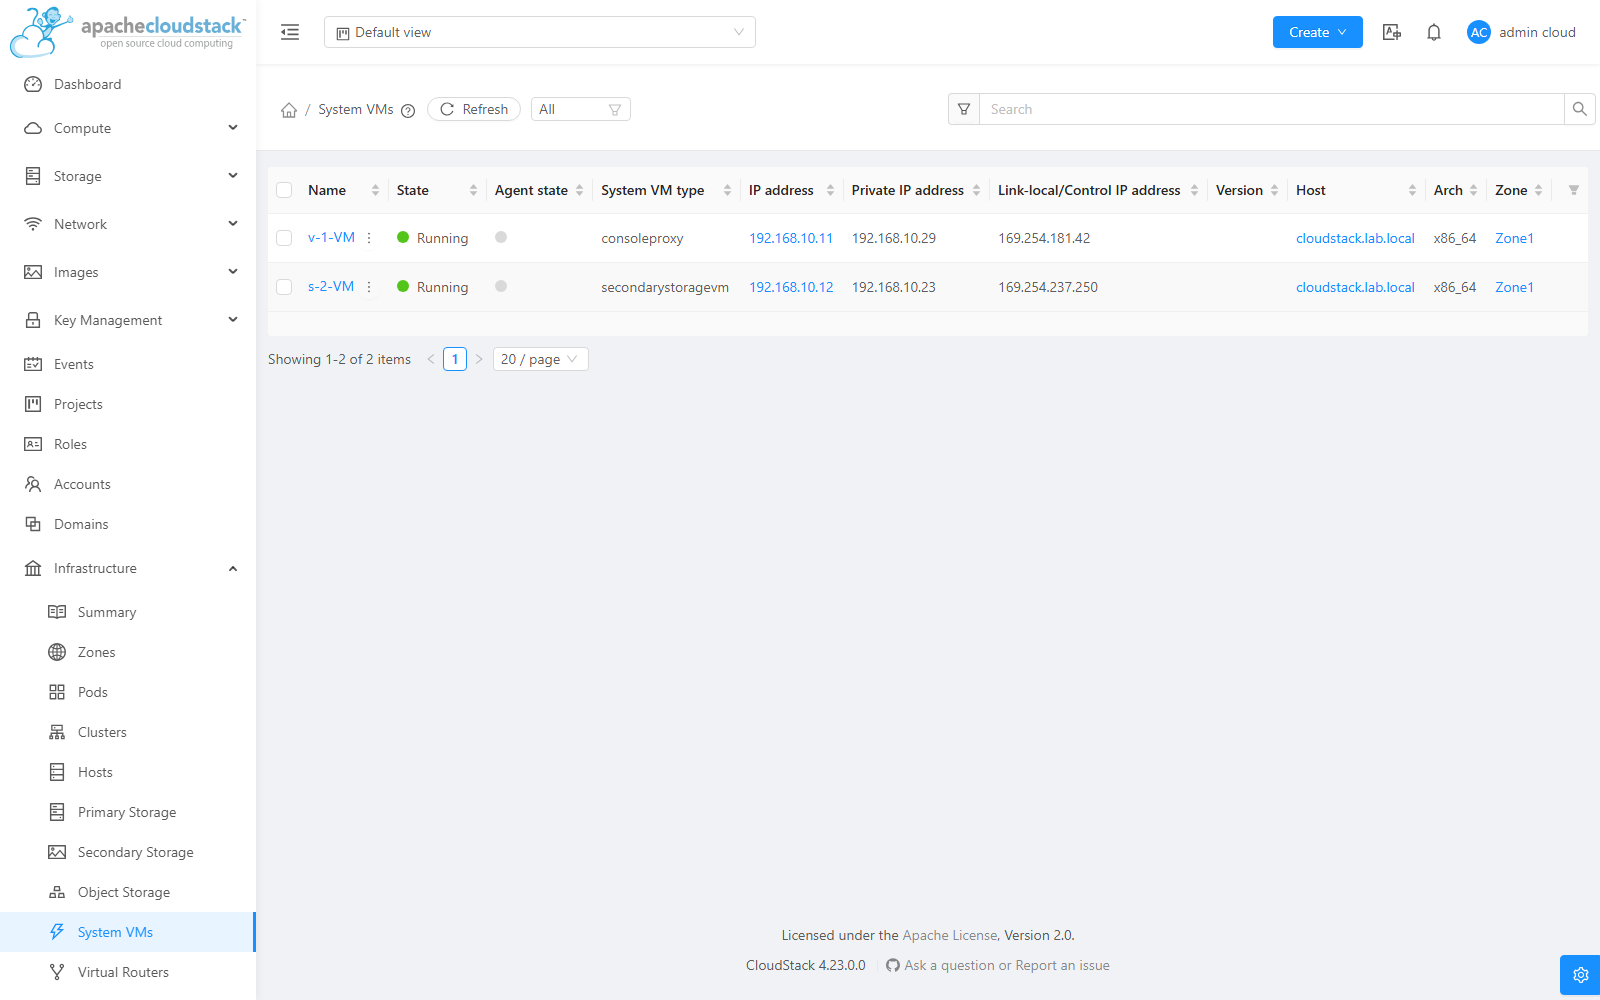
After enabling the zone, CloudStack automatically creates and starts two system VMs:
- Secondary Storage VM (SSVM) — manages secondary storage
- Console Proxy VM (CPVM) — provides the UI console
Wait for them to come up:
sudo mysql -e "SELECT name, state, type FROM cloud.vm_instance WHERE type IN ('SecondaryStorageVm','ConsoleProxy');"
Both should show Running. This takes 2-5 minutes.
Verification
Check the complete state:
# Zone
sudo mysql -e "SELECT name, allocation_state FROM cloud.data_center;"

# Host
sudo mysql -e "SELECT name, status, hypervisor_type FROM cloud.host;"

# Storage
sudo mysql -e "SELECT name, status, scope FROM cloud.storage_pool;"

# System VMs
sudo mysql -e "SELECT name, state, type FROM cloud.vm_instance WHERE type IN ('SecondaryStorageVm','ConsoleProxy');"
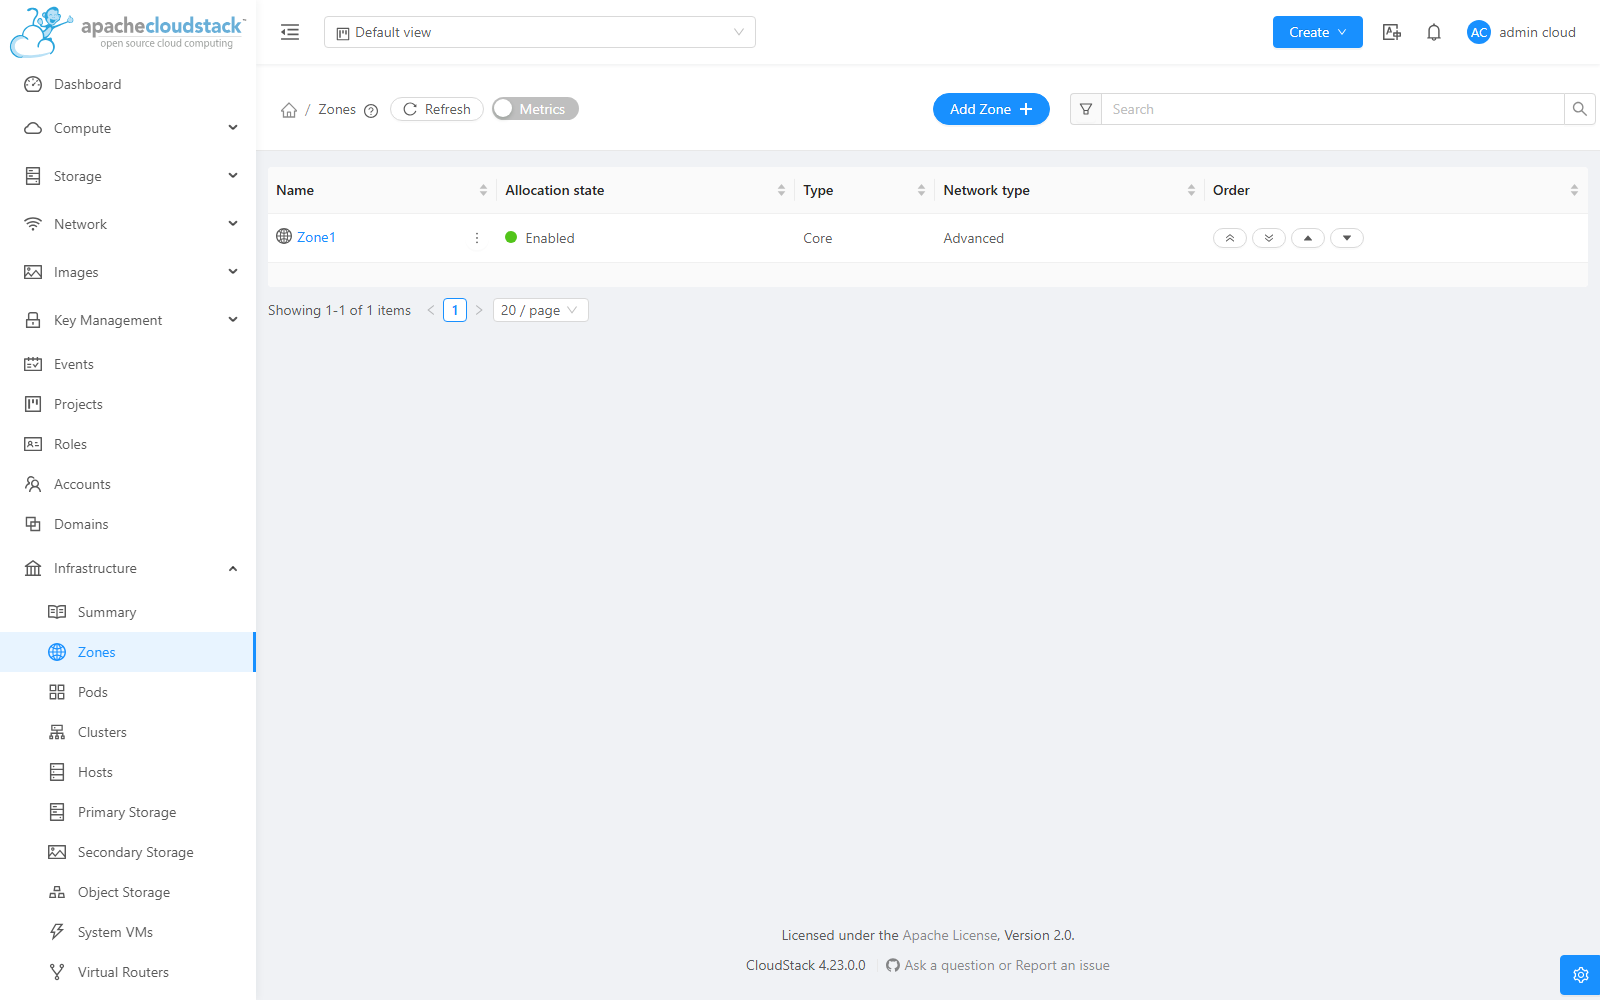
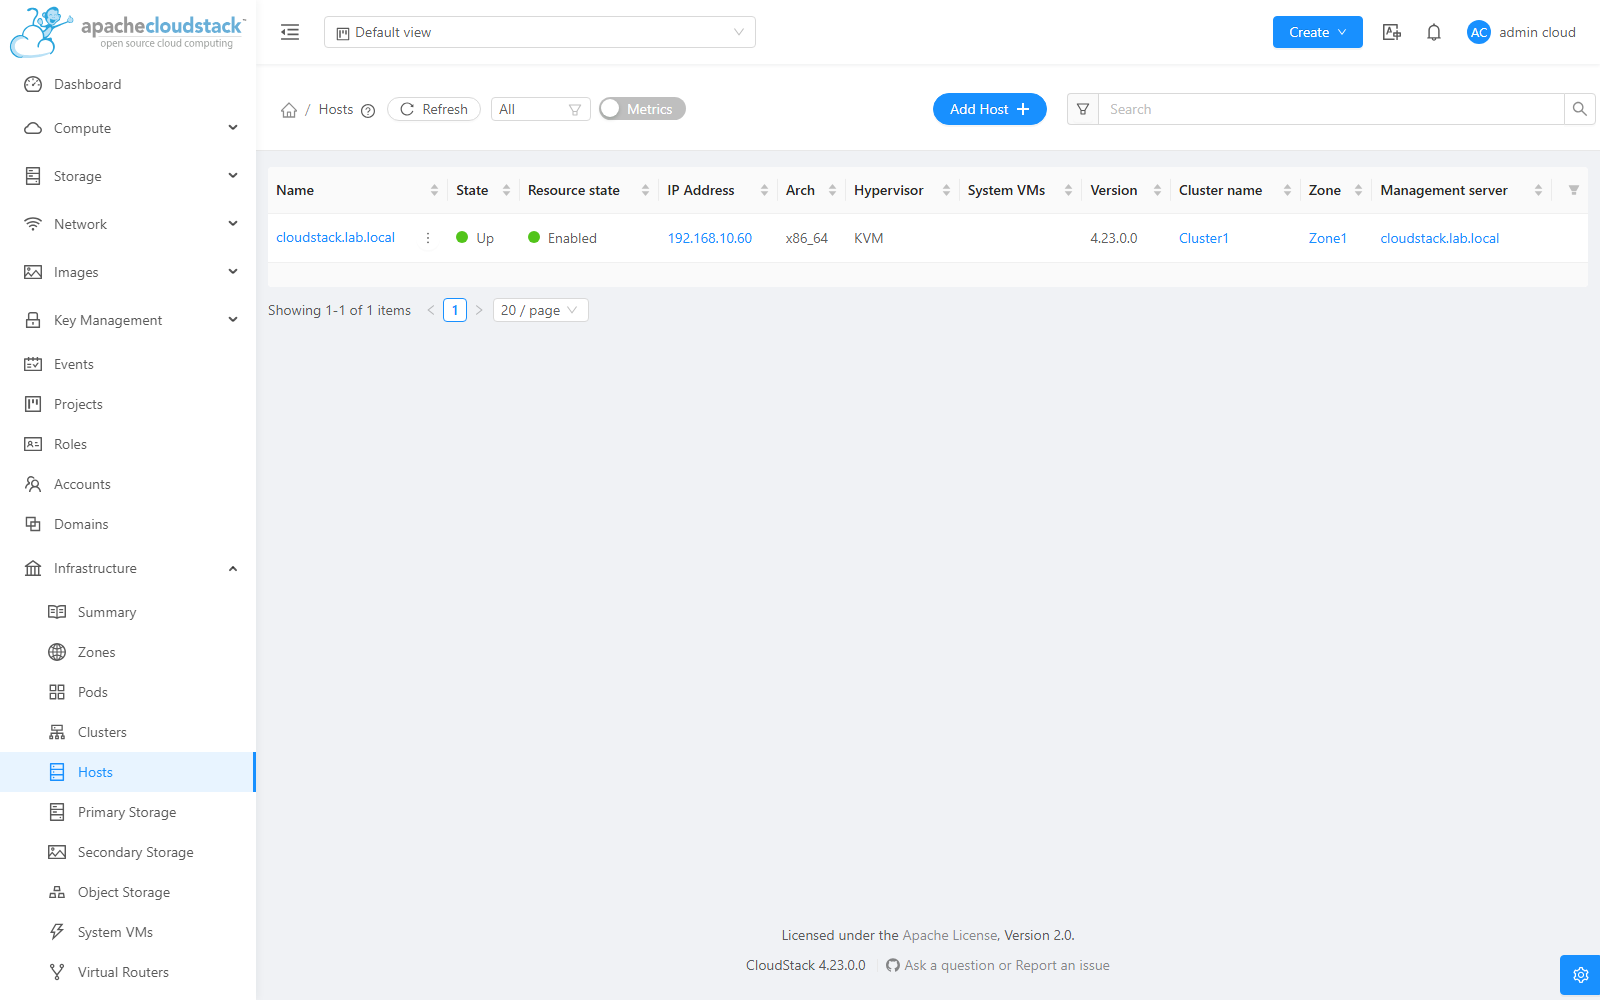
All should show:
- Zone:
Enabled - Host:
Up,KVM - Storage pools:
Up - System VMs:
Running
Issues Found and Fixes
| Issue | Cause | Fix |
|---|---|---|
MySQL server_id=source-01 fails | MySQL 8 rejects non-numeric server_id | Use server_id=1 |
| UI returns HTTP 503 after install | cluster.node.IP=127.0.1.1 in db.properties | Set to real management IP |
| Agent “No route to host” | Agent configured with old management IP | Fix host= in agent.properties |
| Traffic labels NULL | Wizard did not set kvm_network_label | UPDATE to cloudbr0 |
| API returns 401 for all requests | Session key validation broken | Use UI instead |
What’s Next
With the zone running, you can:
- Register a guest template (Images → Templates → Register Template from URL)
- Deploy test instances (Compute → Instances → Add Instance)
- Configure network offerings and security groups
- Set up a second KVM host for a multi-node cluster
Part 3 will cover template registration and deploying your first workload.